Add Task Scheduling to Your Minecraft Server🕛
- HolyHosting

- Oct 27, 2025
- 3 min read
Hello, HolyHosting community! 🎮🌟
This time, we’re here to help you make the most out of your HolyHosting control panel by showing you how to schedule tasks for your servers. Automating these tasks will let you manage your Minecraft server more efficiently and effortlessly. 💡
What Are Scheduled Tasks?
Scheduled tasks are actions you can set up to run automatically on your server. They can be as simple as sending reminder messages to your players, creating backups, or restarting the server. Forget about having to monitor everything manually — let automation do the work for you! 🤖
Accessing Scheduled Tasks
To access your scheduled tasks:
Go to the menu on the left side of your server details page.
Select "Schedules"

In this section, you can create a new schedule.

A window like the one below will open, where you can:
Name the schedule
Specify the Minute, Hour, Day of the month, Month, and Day of the week when the schedule will start running.

Now, let’s add some tasks we want our schedule to perform.
Creating a New Task

Once you click the “New Task” button, a window like the one below will open. Next, we’ll show you the types of tasks you can create.

Send Command: This allows us to write a command that we want to be executed in the “console” window shown in the image.
Send Power Action: With this option, we can set the schedule to perform actions such as starting, stopping, or restarting the server.
Create Backup: As the name suggests, this will create a backup of your server (you can choose which files to ignore).
Step-by-Step: Creating a Scheduled Task
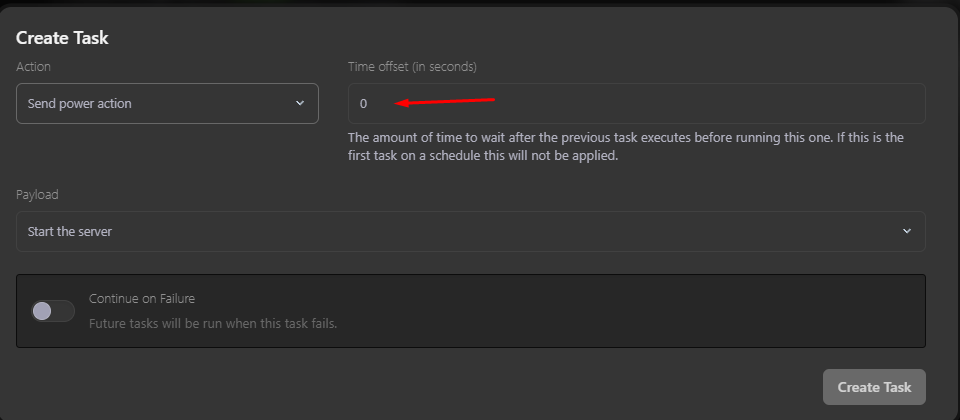
Create an Action: For this example, we’ll use the “Send Power Action” option — this allows us to choose between starting, stopping, or restarting our server.

Time Offset: In this section, we’ll enter the amount of time to wait after the previous task has been executed before running the next one. (In this case, as shown in the image, since this is the first task in the schedule, this setting will not apply.)

Payload: In this section, you’ll specify which action you want the task you created to execute.

Continue on Failure: As shown in the image, future tasks will still run even if this task fails.

All set? Click the “Create Task” button.

Run Now: Once the task is created, a button will be enabled to run the schedule immediately if you don’t want to wait for the date/time you set.

More Tasks: As we’ve seen, we can add more tasks to our schedule. In this case, we’ll create a task that sends a command to give a user “OP” status.


(Remember to enter the command without the “/”)

Testing the schedule we created…
Let’s test that our schedule works correctly by clicking the “Run Now” button.

As we can see in the image below, the schedule we created ran successfully — it first started the server and then gave OP to the user we selected, as shown in the console.
Done! You’re now ready to create your own schedules for your server.
More Functions
We can add multiple tasks to our schedule. For example, I’m going to add the task “Shut Down the Server.”

Conclusion
We hope this guide has been helpful! 🚀 Remember, don’t hesitate to ask questions on the HolyHosting Discord or contact our support team.
Follow us on Twitter @HolyHosting to stay up to date.

Stuffy @ HolyHosting


