How to Upload a Minecraft Realms World to My Server
- HolyHosting

- Oct 14, 2025
- 2 min read
Hello! In this guide, we’ll show you how to upload your Minecraft Realms world to your own Minecraft server. If you follow each step carefully, you’ll be able to complete the process in just a few minutes.

To get started, we need to download the Realms world. Here’s how:
If it’s Minecraft Bedrock:
Launch Minecraft.
Select Play on the main screen.
Go to the Realms tab.
Select the Realm you want to manage and click Options.
Choose Realm Settings from the options menu.
Select the Realm slot you want to edit.
Click Edit World.
Scroll to the bottom of the game settings and click Download World.
If it’s Minecraft JAVA:
Launch Minecraft.
Select Minecraft Realms.
Click the Realm with the world you want to download.
Select Configure.
Go to World Backups.
Click Download Latest.
Select Continue.
Once the world is downloaded, we need to access the .minecraft folder:
Press the Windows key and type %appdata%.
Open the .minecraft folder (if you don’t see it, go into the Roaming folder first).
Navigate to saves. Here, you’ll find the downloaded world.

Alright, now that the world is ready, let’s access our server panel via SFTP. To do this:
Go to your server panel and open the "Configuration" section, then click on "Start SFTP" (You’ll need WINSCP or Filezilla installed to do this).

Once you start SFTP and enter your credentials, simply drag the world file into your server’s files. (If the world is very large, we recommend compressing it before uploading it to the server.)

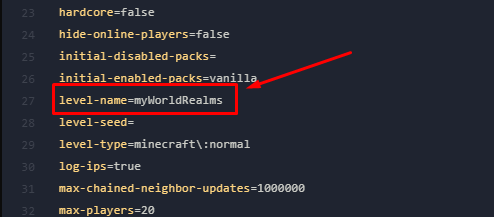
Once you’ve uploaded your Realms world, you’ll need to either rename it to “world” or edit the server.properties file so it’s recognized as the main world!

Conclusion
We hope this guide has been helpful! 🚀 Remember, don’t hesitate to ask questions on the HolyHosting Discord or contact our support team.
Follow us on Twitter @HolyHosting to stay up to date.

Stuffy @ HolyHosting


